Tips on printing through Photoshop
At last night's Color Management discussion, it became evident that there is confusion and frustration with printing through Photoshop's Epson Driver. This is probably the most common way of printing, so we decided that a tutorial with screen shots is in order. We usually use a RIP software at Dot Editions, but that's a whole other blog entry.
Keep in mind that this method is what works for us at Dot Editions. By no means is this the only way or the right way - it's the way that works for us. This is all about trial and error, as well as your personal preference on how you want your prints to look. Just like in the darkroom!
We would like to thank Radhika Chalasani for allowing us to use her image for these printing demonstrations.
Here we go, starting from the basics of printing through Photoshop:
Download and install the Epson Driver for free from Epson’s website.
Download your choice of paper's ICC profiles from that paper's manufacturer. For this example, we're printing with Hahnemuhle Bartya.
- Go to your paper manufacturer’s website
- Find where they have the ICC Profiles. They are free to download.
- Select the right ICC profile by finding your printer on the list, then by finding your paper type.
- Click to download.
Put the ICC profile in the proper place.
- Find the ICC profile on your computer (probably on the desktop or in “Downloads”). The ICC icon will look like this:

- Drop the ICC profile in the correct folder:
- Macintosh HD/Library/ColorSync/Profiles

While you are at your paper manufacturer’s website, determine their recommendations for paper handling.
- For example, if you have a matte paper, do they suggest setting the media type as Enhanced Matte, UltraSmoothFineArt, or Watercolor Paper?
- If you are printing on a glossy paper, is it Luster, SemiGloss, or Glossy?
Once you have done these steps, and your image is ready to print, go to File/Print. Follow the instructions below to properly handle the settings in the print dialog boxes.
Initial print dialogue box options:
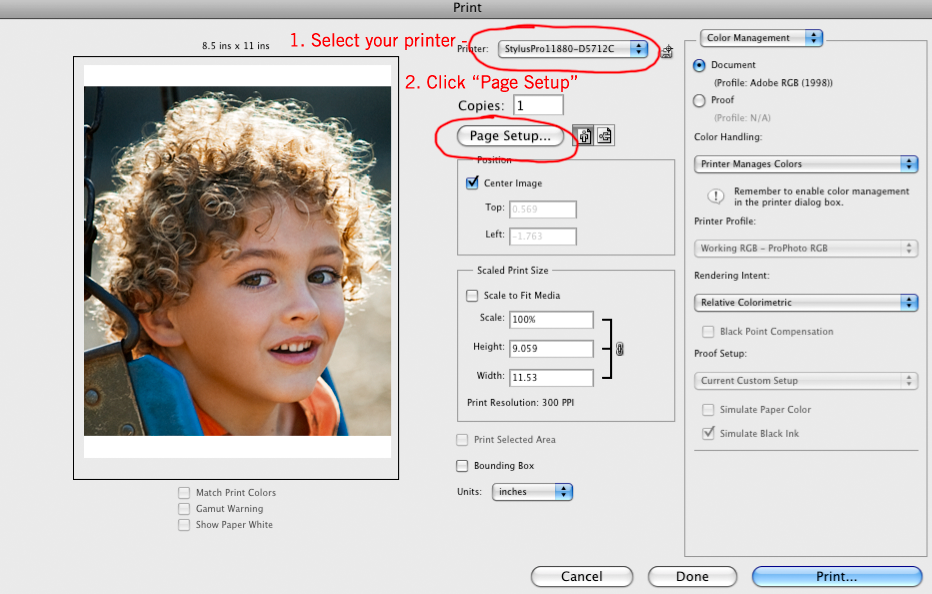
Select your printer, then click Page Setup

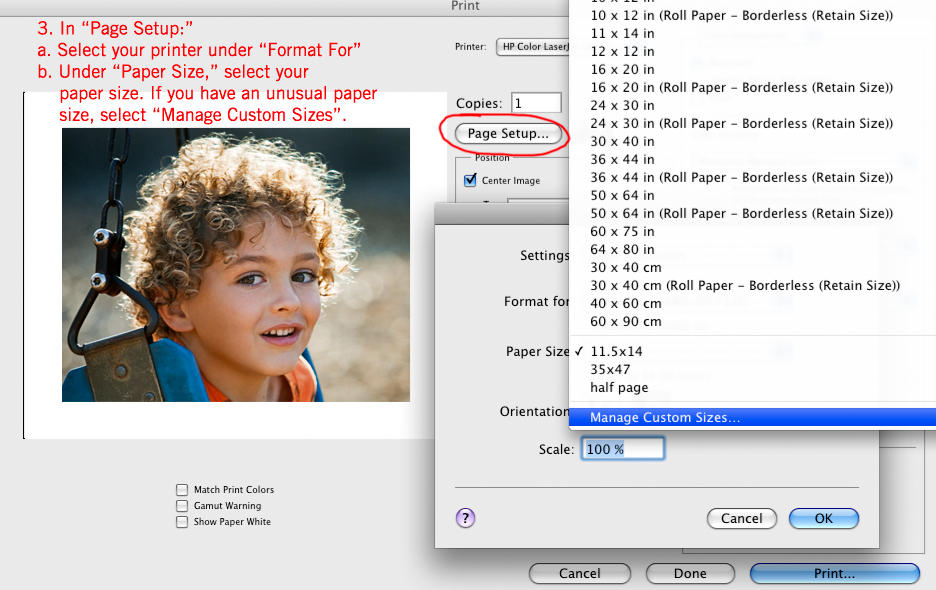
Page Setup Dialogue box options:

Manage Custom Sizes (if you are using an unusual size paper)

Page Setup Dialogue box with your selected options:

Click OK on Page Setup.
That will take you back to your initial printer dialogue box. This is the box where you select the paper profile that you downloaded earlier. In this example, we are using one of Dot Editions custom profiles for Hahnemuhle Baryta. We find that choosing "Perceptual" with Black Point Compensation checked works well for pigment printing.

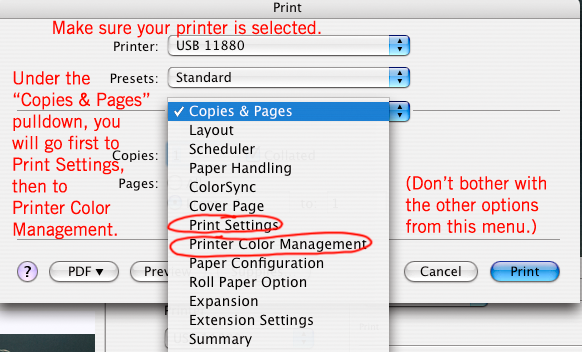
After you press “Print” you will be taken to another print dialogue box, with more options to select. (In the newest version of the Epson Driver for CS4 Extended, the options are collapsed into one window for “Print Settings” and “Printer Color Management”. These screenshots are from the older version that has these options separated. The choices will be the same.)

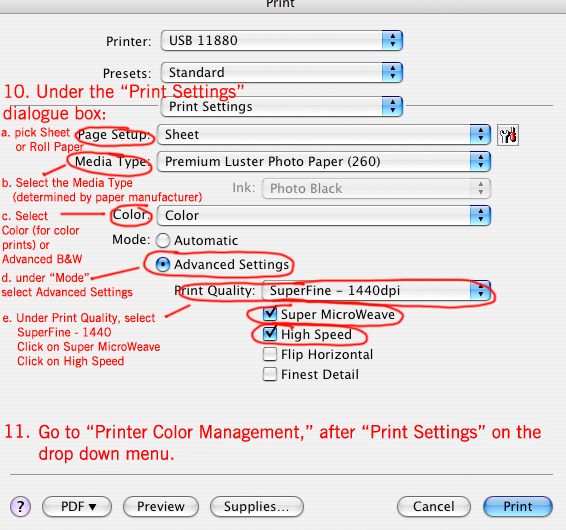
Here in Print Settings and Color Management is where you need to pay careful attention to what you are selecting. For Media Type, refer to your paper manufacturer and see what they recommend for the surface you are using.

One last window before you really print! Turn Color Management OFF (or else you are throwing everything out the window!)

If you would like this tutorial in a PDF version, please email us at print@doteditions.com
