How to calibrate your monitor using Eye-One Match
After last week's blog post about using a calibration work-around for matching prints to monitor images, I thought I'd follow up with a step by step tutorial on how to calibrate your monitor using the Eye One Match software. In this entry, I am calibrating a NEC MultiSync LCD2190 series monitor with an i1Pro spectrophotometer, but these are the same steps if you use another type of calibrator puck. If you use an Eizo monitor, the calibration is through the monitor hardware, so these steps do not apply.
The Eye-One Match software is pretty straightforward - but if you're not confident that you are choosing the right options within the software, read on.
First step: Pick your monitor type - LCD or CRT. Flat screen monitors are LCD, monitors with a tube are CRT.

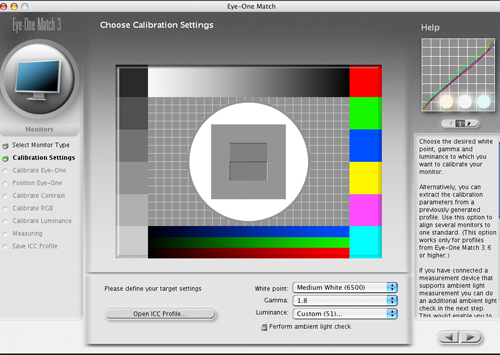
Step Two: Select your white point at Medium White (6500), your Gamma at 1.8, and Luminance - pick custom.
When you pick custom Luminance, it will require you to measure a white patch on your monitor. Open Photoshop, and make a new file with white as the Background Content. Zoom in so that the white image takes up the whole screen. Put your calibrator over that white image on screen. Keep lowering your brightness with the monitor hardware until it measures between 51 and 53. This is how you set your monitor luminance. Do this every time you calibrate your monitor. The reason for this is that monitors out of the box are set much too bright, and the luminance needs to be turned down.

Step Three: Calibrate your Eye-One device.
Step Four: Set the contrast. In the monitor hardware menu, set your contrast at 50%. (I find if I set the contrast at 100% like the software indicates, the monitor is too contrasty and bright for the Eye-one calibrator to work).

Step Five: Set the white point. Using your monitor hardware menu, find the sub-menu where you can manually adjust the white point (it will be under RGB). Make the RGB line up evenly.

Step Six: Adjust the Luminance. In the monitor hardware, adjust the luminance until it matches the target - the number you set in Step Two.

Step Seven: Save ICC profile and Summary Screen. We use a custom name to refer to the monitor this profile goes with. You can click the Before/After to see how your newly created monitor profile shifts from your previous ICC profile.

You're done! For proper monitor calibration, your computer station should be set up in a room that has little daylight (sorry, you have to cover up those windows!), and is as neutral as possible. If your computer is set up in your home office that you painted orange, you're going to have to seriously consider repainting - either grey, or ideally, black. Unfortunately, ideal retouching conditions require pretty gloomy decorating options. But if you follow this advice, you'll have a much easier time getting consistent results in printing, or doing any post-production work. Repeat the calibration process at least once a month.
